VMworld 2015: Are you Ready (for Any)?

VMworld 2015 - Ready for Any

With VMworld just 4 short weeks away, I thought it best to jump in and give some pregame thoughts about the conference. I personally have so much to do to get prepared. I’ve been so busy working on customer projects lately, I’ve had little time to focus on the event. But with the theme for this year’s conference, Ready for Any, I need to do my part to be ready! Time is ticking!

So, first of all, a little pre-VMworld guidance. Without redoing my post from last year, you can view my Lessons Learned about VMworld from last year. A few folks have put out their tips and tricks for this year. You can view them here:

A couple more from last year:

I also highly recommend following the official bloggers this year. These have been preselected by VMware to contribute content related to the conference. There should be some great posts by these individuals. Some are well known; some are up and coming. I look forward to catching their coverage this year during the event.

Speaking of that, Nigel Hickey, one of the official bloggers this year, is putting together some vExpert Spotlight articles. Make sure to catch these. This is a great effort to shed some light on select vExperts who might not be as well known in the community. I’m definitely hoping to meet more of these folks this year.

Of course, VMware has their official page of links to various resources. Check the Social Media and Community Resources page for links to the latest in community content.  VMworld is community rich, so there will be plenty of valuable information fed through these outlets.

Be sure to book some time in for vendor and community events after hours. These are great ways to unwind and meet up with other folks passionate about the community. There is something going on every night of the conference. This is hands down an action packed week, so pace yourself. There is so much going on from early morning to the wee hours of the night. It’ll be easy to get run down, so pick and participate responsibly and conserve yourself for the next day’s events.

If you haven’t already spent hours chipping away, molding, and then tweaking your schedule, I recommend you get over to the Schedule Builder now and sign up for those sessions. Many of them are already booked up, but there are always no shows.  You can still usually get into hot sessions by standing in line at the door. Typically most people who wait eventually get in, so don’t fret if you didn’t get your favorite session. It’s just far easier if you’ve already registered to get in, grab a good seat, relax, and meet a neighbor before the session starts. And remember, these sessions will be recorded.  If you still don’t get in, you can always catch the recording later.

And on that last note, I’ll echo what I mentioned last year. Priority should be on the things you can’t do after the conference. Things like meeting folks, spending time in the Hang Space or on the Solutions Exchange floor, attending the non-recorded sessions like the Group Discussions, attending the various community events…  All of these are super valuable and should not be sacrificed for the content that will be readily available after the event. Even the Hands on Labs, as awesome as they are, will be available at some point after the conference (see VMware HOL Online).

And with that, let’s get ready.  Looking forward to seeing everyone this year!

vSphere 6 Configuration Maximums – Super Scale

monster-vmRemember when we thought that 32 vCPUs and 1TB of memory was a “Moster VM”?  Well…it still is.  However, with applications demanding more resources (think big data or intensive transactional apps), VMs will continue to consume larger chunks of the underlying hardware. With VMware aiming to run any application on their platform, they have continued to build super scalability into the product. vSphere 6 blows past the days of the fierce Monster VM and doubles, triples, even quadruples the limits of the previous 5.5 version (see VMware’s chart below). You can now provision VMs with 128 vCPUs and 4 TB of memory!  I’m not sure what the host would look like, but the bottom line is vSphere is built to handle it.

hw-max-60

These are some incredible leaps beyond the previous version.  Delving back into the archives, it’s fun to see how far VMware has come over the last ten years.  Below is a table showing their progression since the earlier days of GSX 2.0.

VMware Release

2.0 3.0 3.5 4.0 4.1 5.0 5.1 5.5 6.0
vCPU per VM 2 4 4 8 8 32 64 64 128
RAM per VM 3.5 GB 16 GB 64 GB 255 GB 255 GB 1 TB 1 TB 1 TB 4 TB
CPUs per Host 16 32 32 64 128 160 160 320 480
RAM per Host 64 GB 64 GB 256 GB 1 TB 1 TB 2 TB 2 TB 4 TB 12 TB
VMs per Host 128 320 320 512 512 512 2048
Hosts per Cluster 16 32 32 32 32 32 32 64
VMs per Cluster 1280 3000 3000 4000 4000 8000

For simplicity, I’ve added an additional breakdown of all the known configuration maximums for vSphere 6. I’m still waiting to see storage, network and resource pool maximums and will update those as they become available.

vSphere 6 Configuration Maximums

  • vCenter (installable or appliance)
    • 1000 hosts
    • 10,000 virtual machines
  •  Cluster
    • 64 hosts
    • 8000 virtual machines
  •  Host
    • 480 physical CPUs
    • 12 TB RAM
    • 2048 virtual machines (What’s New document states 1000 VMs)
  • Virtual Machines
    • 128 vCPUs
    • 4 TB RAM
    • 32 serial ports
  • vSphere Fault Tolerance
    • 4 vCPUs per virtual machine
    • 64 GB RAM per virtual machine
    • 4 FT protected VMs per host
    • 8 protected vCPUs per host
  • vSphere High Availability
    • 64 hosts
    • 6000 virtual machines

Of especially important significance is the increase of vSphere FT jumping from its hard limitation of 1 vCPU to 4 vCPU.  Finally, the more critical applications that often demand the higher resource capacity and have zero tolerance for downtime, can now be fully protected.

vSphere 6 brings additional scalability enhancements such as vMotion between data centers and hot add memory  support for NUMA nodes.  More to come on these!

For more information, read VMware’s What’s New in the vSphere 6.0 Platform or find additional links on my vSphere 6.0 Announced! page.

vSphere 6.0 Announced!

The long awaited major upgrade of vSphere has been unveiled! Today, VMware’s Pat Gelsinger and Ben Fathi made the official announcement of the vSphere 6.0 release with some amazing innovations. They claim this release offers 650+ new features and enhancements!  The following list highlights just a few of the more noteworthy features:

  • Install and upgrade capability enhancements
  • New hardware, architectures, and guest OS expanded support
  • Scalability increases
  • Storage IO Control additions
  • Storage and availability integration increases
  • NFSv4.1 with Kerberos
  • vMotion enhancements
  • vSphere Fault Tolerance for multi-processor VMs (SMP-FT)
  • vCloud Air integration
  • vSphere replication improvements in scalability and performance
  • App HA expanded support
  • Network IO Control expanded support
  • Web Client enhancements
  • Multi-site content library
  • vSphere host client
  • VMware certificate life cycle management

Along with this product launch, VMware also made announcements of upgrades and advances to the following products:

I will be posting articles over the next few weeks as I delve further into these products and upgrades.  Feel free to check back as I share more content on these exciting releases.  In the meantime, browse the technical docs that VMware has already published:

Or give the products a spin on the free hosted evaluations (Hands On Labs):

VMware will continue to promote these announcements over the next month on their One Cloud, Any Application announcement page as well as on Twitter (along with the rest of the community) with the #vmw28days hashtag.  Be sure to follow!

The New vSphere 6.0 Web Client

While VMware has been busy working on major feature upgrades to the core vSphere product for the 6.0 release, one of the most noticeable and welcomed upgrades might be the enhancements to the Web Client. We are all aware of the difficulties of the previous versions: very slow interface, items in unfamiliar places and missing functionality and plugins. Those who have been in the trenches with VMware over the past many years have grown very accustomed to the comfortable and familiar feel of the vSphere C# Client.  In fact, even with some of the newer features missing from the traditional client, we too often have gravitated back to it because that’s what we know and are used to with its quicker responsiveness.

VMware is trying hard to change that!

They’ve listened to the community and have produced a web client that just might convert the most resistant of users. This client has made vast leaps beyond its predecessors primarily in performance and user experience.

Performance

VMware sifted through every part of the Web Client, determined to make improvements to every part of the user interface and all the way through the software stack. They removed unnecessary code and streamlined the functionality to make this vastly quicker than its predecessors. VMware claims that log in times within the new web client are now up to 13x faster than before, going from an average of 25-30 seconds with the old client to a staggering 5 seconds with the new one. Additionally, each screen and menu click was examined and almost all items were streamlined to run faster. The chart below shows the performance gains, sometimes showing a 4x increase in speed when navigating the user interface. Disclaimer: This chart was part of VMware’s informational overview of the beta version of this product.

Speed-difference-5x-60

I ran my own tests which confirmed the increased speed that VMware has claimed. All navigational clicks are quicker, sometimes only by ½ to 1 second, but that can make a huge difference when working regularly with the Client. The biggest performance leap I noticed goes back to the login sequence. In the 6.0 version, the login prompt displays almost instantly, whereas in the older 5.x Client, there was usually an eight or nine second delay!

One of the challenges VMware had in re-engineering the Web Client were the differences among the various web browsers and how they handle code. One of their major findings was that Firefox was much slower than Internet Explorer or Chrome when using the Web Client. In some cases, Firefox took almost twice as long to load certain elements. VMware’s recommendation is to use IE or Chrome to get immediate performance enhancements even with the older 5.x version of the Web Client.

Improved User Experience

VMware really set out to bring some of the familiarity of the C# Client to the Web Client by putting elements back in their place. For example, the Recent Tasks pane was returned to the bottom of the screen where it has traditionally lived in the C# Client. This not only aides easier transition to this Client, but also provides more space to display more data. When previously placed on the side, the amount of space was too constrained for key information.

Right-click drop-down menus have been flattened, which allows for quicker interaction and easier flow. Instead of drilling into sub-menus such as the “All vCenter Action Items” sub-menu in the previous Web Client, we now get all of our major menu action items from each primary drop-down menu.

The illustration below shows the difference between the menus in the 5.5 Client and 6.0 Client.

Web5x-dropdown-menu
5.5 Web Client
6.0 Web Client
6.0 Web Client
Home button and menu on Web Client 6.0

Another enhanced feature is the Home button. Just hovering over the Home button near the top of the UI, brings up the root menu for all major inventory components of the infrastructure. Now, one click is all that’s required to navigate to each of the most used components and options. This might seem like a minor improvement over the Home and vCenter buttons with the 5.x Web Client, however the simplicity of having all functionality in one menu and with one click just seems more streamlined.

Finally, each of the element panes of the user interface can be moved around. If you prefer to have the Recent Tasks on the side, move it back. If you wish to have the Alerts pane on the bottom of the interface to mimic the C# Client, move it there. The layout is a property of the user profile, so multiple users can have their own customized layout upon logging in. This feature can also be completely disabled by the administrator to further control its use. Working with this feature, I personally had some struggles moving the panes and formatting everything to my liking. The functionality does appear to be a bit on the clunky side, and I did at one point get the UI a bit jumbled, but thankfully there is a “Reset to Default” option under the Help menu to restore the panes back to their original spots.  Harmony restored.

Added functionality

This release of the Web Client added little to the Plugin functionality that wasn’t already there. SRM functionality was missing until the latest release of SRM 5.8, but as of today, it works with the current 5.5 and later versions of Web Client. VMware Update Manager, however, is still only available through the C# Client or as a stand-alone install on a Windows Server. VMware has stated they are working on its compatibility for future releases. I expect they will iron out any remaining holes in functionality soon as the C# Client will be shipped one last time, presumably with this 6.0 release. I imagine once VUM is ready for the Web Client, the old client will be phased out completely, going the way of the service console heavy ESX. But for now, this still leaves us with two clients to use if we wish to leverage VUM or other third party plugins that do not have integration developed yet for the Web Client.

VMware has made it clear they are limiting the functionality of new features to the Web Client.  We have already seen this with the previous versions of the C# Client that did not support new products and features such as VSAN, so this is nothing new. However, there is one important exception to this, which has to do with hardware versions 9 through 11 (vSphere 5.1, 5.5 and 6.0, respectively).  Virtual hardware settings from all hardware versions can still be viewed with the 6.0 C# Client.  In addition, the C# Client can be used to modify any hardware feature that was available in version 8 or below, such as adding or removing vCPU/RAM, on any VM, even those with hardware versions 9+. The newer features that were added with versions 9 through 11, such as vSphere Flash Read Cache, can only be modified with the Web Client.

So there it is – a quick overview of the new and relatively zippy Web Client 6.0. As stated, this might be one of the most welcome upgrades offered in vSphere 6.0. The quality of the user experience can mean the life or death of any product and VMware certainly delivered a significantly improved product. Putting in some mileage in my own lab environment, I was excited to witness and experience these enhancements firsthand.  Kudos to VMware for listening to their customers and making these major improvements while setting the stage for greater feature enhancements and functionality down the road.

For additional articles on new vSphere 6 features and product launch info, be sure to link to my vSphere 6.0 Announced! post.

New Features of vRealize Operations 6.0

During VMworld Barcelona in October, VMware announced the upcoming release of vRealize Operations 6.0, the latest in the new vRealize product line. As most are aware, the vRealize suite is a rebranding and updating of many of the vCenter management products. Simply put, vCenter Operations Manager will now be vRealize Operations Manager (vROps) starting with the 6.0 release.

The General Availability for vROps 6.0 was December 9, making this now available for the public to download and deploy into their own environments. I am super excited about this version with its impressive new capabilities. Over the next few months, I will share some of my own observations about the new features, updates to old features, enhanced interface, and experiences with the more efficient and effective virtual management in my environment.

Just a quick overview for now, here are some of the major capabilities and a selection of the new features of this version (mostly taken from VMware’s marketing):

Intelligent Operations

New Intuitive Operations Dashboard – Along with the new user interface and customizable dashboards, the analytics engine provides even deeper views into health, risk and efficiency. Here’s a quick glance of the new UI:

vROps UI

Smart Alerts function – Along with the predictive analytics with dynamic thresholds that vCOps has been known for, vROps adds on the additional value of Smart Alerts. When a problem arises in the environment, these alerts consolidate various metrics and plainly state what is wrong, what the underlying cause is, what resources are impacted, and actions to take to fix it.  It will provide actionable recommendations along with one-click action buttons for immediate remediation of the problem!

Dependency mapping – vROps will map infrastructure services to applications and leverage the analysis of these application dependencies for quicker root cause analysis.

Advanced capacity modeling with capacity planning and project management – Put together “what if” scenarios, not just for the vSphere objects, but also physical infrastructure and application metrics.

Policy-Based Automation

Correlation of change events to performance impact – vROps will monitor changes in performance and map them back to recent configuration changes in the environment. Another feature that will simplify problem resolution and/or prevention.

Automated capacity optimization – Automatically rightsize VMs to reclaim idle resources as well as leverage “what if” scenarios to optimize future growth and deployments.

Guided remediation and automated workflow triggers – Smart alerts will provide recommended actionable remediation steps, and automated remediation workflows can also be configured based on specified thresholds. Imagine alerts triggering corrective action to keep the data center within proper configuration, compliance and performance standards.

Flexible policy management – Apply custom policies for specific workloads, applications and clusters. Apply higher priority policies to critical infrastructure.

Unified Management

Scale-out and resilient platform – This is a more robust solution than its predecessors allowing ability to scale to larger environments as well as failover and replication capabilities for higher resiliency.

Unified UI to manage vSphere and non-vSphere environments – Single pane of glass visibility into all areas of cloud, virtual, and physical infrastructure, whether vSphere, Hyper-V and Amazon. Also extends the use of management packs for various hardware and software platforms.

Application, database, and OS monitoring – Visibility into all areas of the software side of the environment, from the hypervisor down to the guest OS and resident applications.

Storage analytics and unified storage visibility –See the impact of storage infrastructure changes on the application, thus further enhancing the ability to resolve problems quickly and determine storage capacity and performance restraints.

Third-party management packs – As stated above, vROps extends the use of management packs for third party applications like Microsoft server applications, SAP, Oracle, Hyper-V, Amazon as well as hardware and software platforms. It truly offers the unified operations management suite.

Integration with VMware’s cloud management stack – From Log Insight to vRealize Automation, to vCloud Air, vROps continues to build on VMware’s broad management platform for efficiently managing the entire cloud environment.

I’m eager to dig into each of these new features and discover the impact this new vRealize Suite will have on our environment as well as our customers’.

Here are a few quick links for further exploration:

vRealize Operations Manager product page

vRealize Operations Manager 6.0 software download

Free 60-day evaluation download

vRealize Operations Manager 6.0 release notes

vRealize Operations Manager 6.0 documentation

vRealize Operations Management Suite documentation

Take a test drive on the Hands-On Lab, HOL-SDC-1401-HOL Cloud Management with vRealize Operations

vCOps Part 3: Upgrading the vCOps vApp

Upgrading vCOps is relatively straightforward, but can be a lengthy process.  Since VMware recently released minor update 5.8.3, I thought this would be an ideal time to share the procedure for upgrading the vApp.  As an added treat, I’ve also included the procedure for upgrading the underlying operating system for the vApp as this latest version requires SUSE Linux Enterprise Server 11 SP3.

The release notes for the vCOps 5.8.3 vApp can be found here. (Installable version can be found here). These notes contain all necessary details regarding new features, prerequisites, upgrade procedures, and known issues.

As a warning, since upgrading to the 5.8.3 vApp requires upgrading the underlying SLES operating system, additional downtime will be required.  Plan accordingly.

Please also note, the following procedures apply to the vApp only, as in my previous posts.  Please see VMware’s documentation here for upgrading the installable version.

Upgrade the vCOps vApp

1. Take snapshots of the UI VM and Analytics VM.  These can be deleted after the successful upgrade.

2. Download the VMware-vcops-5.8.3-2076729.pak file from the VMware vCOps 5.8.3 download page.  A my.vmware.com login is required.

3. Log in to the Administration portal of the vCOps app (https: //<IP address of UI VM>/admin), using admin credentials.

4. Click on the Update tab in the Admin portal and click on the Browse button under the Update package section.  Browse to the .pak file downloaded in Step 2 and click Open.

upgrade1

5. Click Update to open the update dialogue window.

6. Click OK to confirm the update.

7. Wait for the file to upload.

8. Accept the terms of the EULA and click OK.

9. Click OK to confirm the update.

10.  Wait for the update to complete.  The admin page will likely refresh and kick you out.  You might get the following message:

“The web server is not yet available.  You will be re-directed when service is available.”

Once the web server is available again, the site will automatically refresh and the logon page will reappear with a warning that the update is still in progress.  Log in to monitor the progress.upgrade2

11.  Monitor the update progress…<yawn>

upgrade3

12. This process may take a long time.  You will receive the following message when the update is complete:

Last update completed successfully

13. At this point, both the admin portal and the Analytics/UI VMs will show the new version:

upgrade5

upgrade6

14. You might need to reapply the vCOps license file in vCenter Server, otherwise functionality might be reduced.  In my case, functionality appeared to be unchanged and I confirmed that the license level under the Registration tab was unchanged.

15. If the license has to be reapplied, the services must be restarted.  Go to the Status tab and click on the Restart button.

16. At this point, open the vCOps UI portal and verify proper display and functionality of the upgraded vCOps environment.  Clicking on the About link in the upper right corner will also confirm the version number.

Upgrade the OS to SUSE Linux Enterprise Server (SLES) 11 SP3

VMware declares this step as necessary to run the latest version of vCOps 5.8.3 vApp.  The 5.8.2 vApp was shipped with SLES 11 SP2 so apparently Service Pack 3 is required to fully support 5.8.3.

1. Verify that vCOps 5.8.3 upgraded successfully.

2. Backup or take a snapshot of the Analytics and UI VMs.

3. Log on as root to the UI VM console.  The root password should have been created during the initial installation of the previous version.

4. Check the root password expiration date by running the following command on the UI VM:

chage -l root

Verify the password will not expire during the upgrade process.  If it does, change the password prior to the upgrade.

5. Download the SLES 11 SP3 .pak file (VMware-vcops-SP3-2069574.pak) from the VMware vCOps 5.8.3 download page and copy the file to /data drive on the UI VM.  I used WinSCP for this step.  The file is 3.2 GB so make sure you have the disk resources to copy this into the vApp.  The vApp should have been provisioned with plenty of space, but confirm the sufficient disk space on the underlying physical disk if the vApp was thin-provisioned.

6. Run the following command on the UI VM to start the upgrade process:

/usr/lib/vmware-vcops/user/conf/upgrade/va_sles11_spx_init.sh /data/VMware-vcops-SP3-2069574.pak

This will upgrade both the UI and Analytics VM.  Upgrade will start on the Analytics VM and then the UI VM.  The message, “INIT: version 2.86 reloading” will appear during the upgrade process on each VM.  The entire process can be quite lengthy.  The upgrade process is complete when the command prompt returns on the UI VM console.

7.  Restart the vCOps vApp.

8. Log back into the vCOps User Interface to verify the service is back up and running.

Upgrade is complete!

vCOps Part 2: Configuring vCOps for vCenter

In Part 1, I walked through the procedure for installing vCenter Operations Manager. In Part 2, I will walk through initial setup configuration steps to allow full integration with your vSphere environment.

  1. Open the console for the UI VM within the vC Ops vApp. You will see a similar screen as this. Note the IP address is the one that was defined when you installed vC Ops. This will be the IP address used to configure the admin settings in the next step.Config-console
  2. Open the vCenter Operations Manager Administration web interface. This can be accomplished using one of the following two methods:
  • Click on the link within the Getting Started tab of the vCenter Operations page of the vSphere Web Client. Clicking on “Open vCenter Operations Manager” for the first time will take you to the Admin interface.Config-UI– OR –
  • Point your browser to https://{address of UI VM}/admin.

3. Accept any security exceptions.

4. Login using the default credentials: username: admin, password: admin.Config-adminlogin

5. Once you successfully log in, the Initial Setup Wizard will launch. Type in the IP address or FQDN of the vCenter Server that’s hosting the vApp. Then type in the credentials for an account that has administrative access to vCenter. Make sure the Analytics VM is the correct IP address. Click Next.Config-hostvCenter

The virtual appliance will update details for a few moments.Config-updatevapp

6. Click Yes to trust the server if prompted for a security alert.

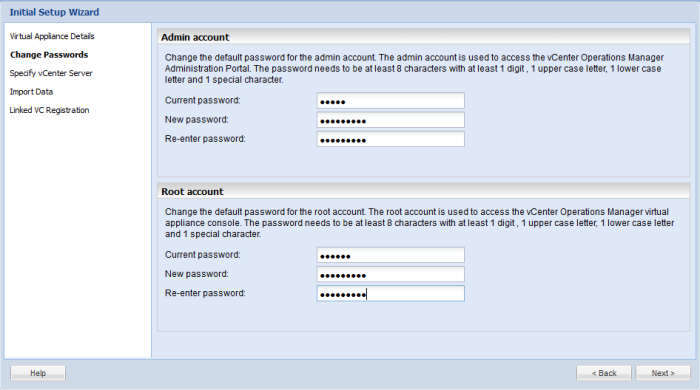
7. Change the default passwords. Remember, for the admin account, the current password is “admin”. For the root account, the current password is “vmware”. The admin account is used for the admin interface while the root account is used for command line use on the vC Ops virtual appliance console. Note the strong password requirements. Click Next. It might take a while to change the root account password.Config-changepass

8. Type in the required information for the vCenter access. The registration user is a user account that ideally has administrative access to vCenter. Click Next.Config-monitorvCenter

9. This will validate the vCenter access settings and if successful, advance to the next screen. Click Next.Config-validatevCenter

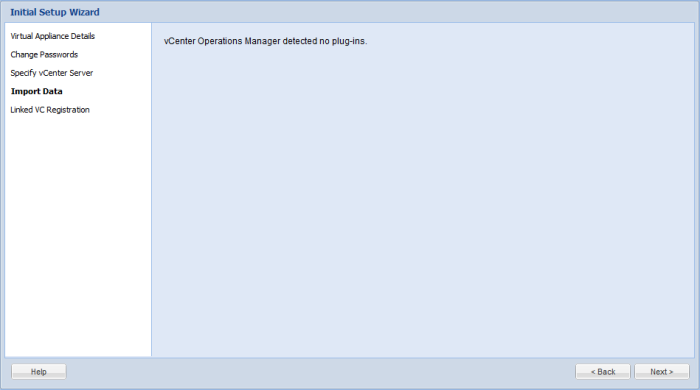
10. It will also check for any other vCenter servers linked to this instance of vCenter. Click Next.Config-nolinkvCenter

11. Click Finish to register the vCenter Server instance. This could take a few minutes.Config-registervCenter

12. When the registration is completed successfully, you will see the following screen. At this point, vCOps is successfully configured.Config-success

13. You can now navigate to the web address of the vC Ops UI: https://{address of UI VM}/vcops-vsphere. Or you can click on the same link within the Web Client, “Open vCenter Operations Manager”.Config-UIlogin

14. Login with the admin credentials you supplied earlier.Config-vCOpsUI

If you’re like me and trying to build this out in a small lab (ie, a laptop!), then you might get some frightening numbers on initial launch of the application. Not to fret. These numbers will likely stabilize as vC Ops learns the environment and determines what is considered “normal” range.

OK, vC Ops is now up and running. Start exploring the dashboards, charts, alerts, badges, etc. It is a fun product to explore since there is so much packed into this product. Next time I will discuss the major badges.

vCOps Part 1: Installing vCenter Operations Manager

The following is a Quick-Start guide for installing vCenter Operations Manager. It is a very straightforward setup, but it does have a couple preliminary steps, which will make the installation go much smoother. This article is written for vC Ops version 5.8.2 using the vSphere Web Client.

Install the VMware Client Integration Plug-in 5.5.0

When using the Web Client, the VMware Client Integration Plug-in is required for both deploying OVF’s as well as accessing VM consoles. If you haven’t already installed this, do it now before proceeding. I found the easiest way is to click on the link in the Web Client logon screen below the username and password fields. Follow the prompts and accept all defaults. You will be instructed to close the browser window. Upon completion, launch the Web Client again and choose to allow the plug-ins when prompted. You might even need to close the browser once more after changing the security settings. Once the link to “Download and Install the VMware Client Integration Plug-in” is gone, you are ready to proceed.

Configure the IP Pool

vCenter Operations consists of two VM’s deployed as a vApp. In order to prepare for the network configuration of the vApp, we must first set up the IP Pool.

  1. In the Inventory pane of the Web Client, click on the Datacenter object and then click on the Manage tab in the Content pane, and then click on Network Protocol Profiles. Then click on the “+” icon in the Network Protocol Profiles content area.IP Pool
  2. Enter a name for the IP Pool and choose the associated network. This will be the network that the VM’s of vC Ops will reside in.IPPool-NameNetwork
  3. Enter the network address for the corresponding network along with the subnet mask, gateway and DNS server addresses. There is no need to enable the IP pool.IPPool-IPv4
  4. At this point, you can configure IPv6 or other network configurations, but these settings are not necessary.
  5. Review the Summary information and then click Finish to complete. You will now see your Network Protocol policy in the Web Client window:IPPool-ConfiguredSettings

Deploy the OVF Template

  1. Initiating the Deploy OVF Template wizard for vC Ops can be done using either method below:
  • From the home screen on the Web Client, click on the vCenter Operations Manager icon and then click “Deploy vCenter Operations Manager”.

–OR–

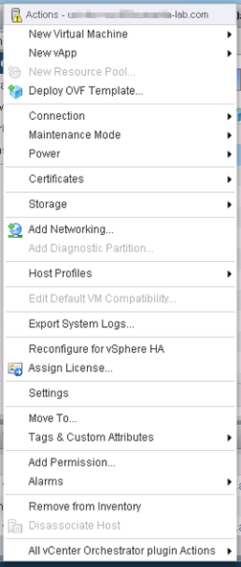
  • Right-click the host that you’ll be deploying the vApp to and click “Deploy OVF Template.” Note: I discovered it’s quicker to use this option if you already downloaded the OVF template from VMware’s website and have the file saved to a local folder easily accessible from the Web Client.
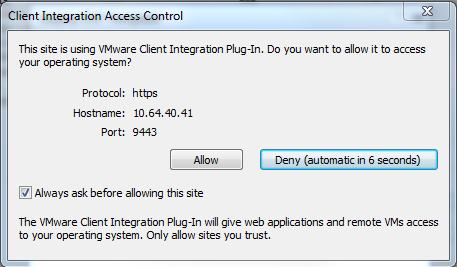
  1. If you get the following prompt, uncheck the “Always ask before allowing this site” checkbox and then click the “Allow” button.DeployOVF-SecuritySetting
  2. The Deploy OVF Template wizard will launch. If you initiated the deployment using the vC Ops icon, the Source will automatically be pre-populated with the URL of the download file on VMware’s website. You will just need to supply the credentials for your my.vmware.com profile. Note: If you opted to right-click the host and click “Deploy OVF Template” in Step 1, you will have the option at this point to either download the OVF straight from VMware’s site or browse to the location of the file if you already manually downloaded it.DeployOVF-SelectSource
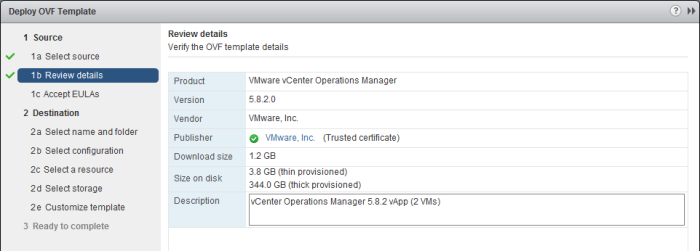
  3. Review the details and click Next.DeployOVF-ReviewDetails
  4. Accept the EULA. Click the Accept button and then click Next.DeployOVF-AcceptEULA
  5. Type a name for the vApp and then choose a folder or datacenter object to deploy the template.DeployOVF-DestNameFolder
  6. Select the size of deployment.DeployOVF-SizeDeployment
  7. Select which host to deploy the template.DeployOVF-SelectHost
  8. Select which datastore and virtual disk format to install the template. Keep in mind that if you choose “Thick Provision” for the disk format, you will need 384GB of disk space. Thin provision only requires 3.8GB.  If storage policies are enabled, you will also have the option to select the policy. DeployOVF-SelectStorage

After clicking Next, you might get the following error:  “A connection error occurred.  Verify that your computer can connect to vCenter Server.

This is likely caused by a DNS issue or firewall setting. I ended up running the deploy template wizard directly from the vCenter server to get around this error. I obviously had a network issue somewhere that would ideally need to be resolved. For our purpose, my workaround was sufficient.

  1. For IP allocation, choose Static or DHCP depending on your environment. Verify the destination network settings.DeployOVF-SetupNetwork
  2. The next screen will allow minor customization. You might get prompted for invalid settings. If so, just manually change the time zone and IP address settings to match your environment.   The IP addresses will be the specific IP addresses you allocated each of the two VM’s that make up the vApp.DeployOVF-CustomizeTemplateError
  3. Review the settings in the last screen and then click Finish.  You will notice the task is running in the Recent Tasks pane on the right.DeployOVF-RunningTask

Tip… I had a problem deploying directly from VMware’s site. The Deploy OVF template task hung at 35%. I ended up having to cancel the task and then manually deploy after downloading the OVF template first (Option 1.b. above). I found it easier and faster to deploy after already downloading it – it took about 3 ½ minutes to deploy that way!

In the inventory pane, you will see the vApp with the two vCenter Operations VM’s: Analytics VM and UI VM.

DeployOVF-vAppInventory

Clicking on the vC Ops vApp will display the vApp properties in the Content pane.

DeployOVF-vAppContent

Power on the vC Ops vApp

  1. Once the deploy task is completed, you will need to power on the vApp. Right-click the vApp and click Power-On. No need to manually power on each individual VM. The start-up of each VM is controlled by the vApp settings. It will take a few minutes to fully power on the entire VM. Once this has been completed, vC Ops will be ready for initial configuration, which is covered in the next post.ConfigvApp-Startup
  2. While you are waiting for the VMs to start up, right click on the vApp and click Edit Settings.  Note the start order.  Since this is a vApp, it is configured with a very specific start up order and actions.  This can of course, be customized to your environment.

Part 2 of this series will cover the initial configuration of vC Ops to allow it to integrate with vCenter.

Speaking at VMworld!

Last week,  I was ecstatic to receive the confirmation that I will be speaking at VMworld this year – that is on the vBrownBag TechTalk stage.  If you’re not familiar, the TechTalks are 10-15 minute “lightening” talks given by anyone in the virtualization community who has a technology or tech-related strategy to share.  These are completely coordinated by the folks at vBrownBag (huge applause to them!!) with the blessing and help by the VMworld conference crew (again, huge applause!!) and driven by the community at large (yep, here’s to the community!).  These guys are so committed to community and sharing the knowledge and this is a perfect extension of their weekly webcasts.  Two years ago I saw the kickoff of the TechTalks and the enthusiastic reception that followed.  I’ve since watched its popularity grow as the platform has been taken to other conferences (OpenStack Summit) and to the regional VMUG’s (most recently, the Indy VMUG User Conference).

The TechTalk schedule for VMworld 2014 is now online and there are some really neat topics by some amazing folks in the community.  I encourage anyone to check out some of these sessions.  Come support your fellow peers, see the enthusiasm and the passion within the community and learn some cool things.  It’ll all be happening in the VMworld Hang Space.

This year, I will be stepping way out of my comfort zone and stepping up to the plate to offer what I believe is a very exciting topic.  I’ve been delving into vCenter Operations Manager a lot lately, impressed with its rich features offering deep visibility into the VMware infrastructure, monitoring and reporting features, intuitive dashboard displays, capacity planning tools, efficiency and risk analysis, and predictive analytics.  It really is an amazing product.  However, it is only a monitoring and reporting tool – no changes to the environment can be made from vC Ops.  Which means that when it discovers a fault, no action is taken.  This is where vCenter Orchestrator comes into play.

vCenter Orchestrator is a rich automation tool, capable of executing complex workflows.  These workflows could be configured to remediate faults that show up in vC Ops, however there is no native integration between the two.  Not to worry as VMware has come to the rescue and created the vCO Remediation Workflow Package for vC Ops.  This is a plug-in that integrates the two products together.  This allows vCenter Orchestrator to kick off workflows when prompted by SNMP traps initiated by events detected in vC Ops.  Very powerful.  What I will be sharing in my TechTalk is a demo of a use case of this integration.  Of course, squeezing a demo of this remarkable tool into a 10 minute talk will be terribly difficult, but I’m up for the challenge.

Look forward to sharing!

Tour of VMware’s vCenter Operations Manager

As a former network operations guy, I came to depend on the ability to monitor systems, view capacity and performance metrics and have all relevant information at my fingertips when troubleshooting. As a VMware administrator, it was ideal to have all this information in one place. That’s why I came to love VMware vCenter Operations Manager (vCOps) – the one monitoring solution built by the engineers who built the cornerstone virtualization platform in most enterprise environments today.

Sure there are other monitoring solutions out there for vSphere – some much simpler than vCOps – but the depth of visibility, gathered metrics, capacity planning and reporting gained by vCOps make it a hard-to-beat solution. Of course with the exhaustive array of graphs, tables and dashboards, it can be a bit intimidating and might even send some folks off to those simpler solutions. For this reason, I decided to provide an online tour of the features and capabilities of VMware’s robust solution and show how to maximize its usage. This will be a series of posts published over the next few weeks, the first of which will be a quick start guide to installing vCOps and getting it up and running. Before I publish that post, however, here is an extensive list of official VMware resources as well as some other fantastic resources provided by folks in the community to get anyone started. Hope you find this useful.

Downloads

Product and Support

VMware Training

Third-Party Resources